Configuring Wizdom Analytics with Azure

Analytics Data Import (requires Wizdom 6.16.0.7+)
In order to query data from Application Insights at the free tier, a known user-account that has access to the Windows Azure management API has to be configured in the Wizdom Web Application settings. Two keys are required – ApplicationInsightsUsername and ApplicationInsightsPassword.

In order to restrict that data returned, pipe the result into the “where” keyword, and filter on the “timestamp” column: | where timestamp > ago(1d).
When the desired data has been attained, please project the columns into a flattened table layout, and always include the columns itemId and timestamp: | project itemId, timestamp. Please note that itemId and timestamp are case sensitive.
When selecting columns, these can be renamed like this: account = customDimensions.user_loginname. When importing this query, a column named account will be created in the destination table, containing the account names of visitors.
The finished query could look like this:
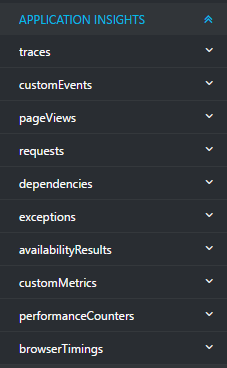
pageViews | where timestamp > ago(1d) | project itemId, timestamp, account = customDimensions.user_loginname
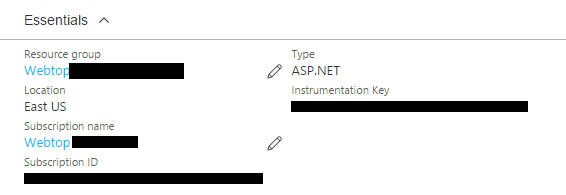
- Resource Group – this is also found in the Essentials pane of the Application Insights instance
- Application Insights instance name – this is the title of the Application Insights instance


In order to restrict that data returned, pipe the result into the “where” keyword, and filter on the “timestamp” column: | where timestamp > ago(1d).
When the desired data has been attained, please project the columns into a flattened table layout, and always include the columns itemId and timestamp: | project itemId, timestamp. Please note that itemId and timestamp are case sensitive.
When selecting columns, these can be renamed like this: account = customDimensions.user_loginname. When importing this query, a column named account will be created in the destination table, containing the account names of visitors.
The finished query could look like this:
pageViews | where timestamp > ago(1d) | project itemId, timestamp, account = customDimensions.user_loginname
Deploying Azure Application Insights
- Login to https://portal.azure.com
- Click the Web Application = <wizdom resource group name>
- Click the Web Application = <wizdom web app name>
- In the Monitoring section click Application Insights
- Click Create a new resource and name it = <wizdom application insights instance name>
- Click OK to create the Application Insights service
- Click the Orange message at the top to start the service
- Click VIEW MORE IN APPLICATION INSIGHTS
- Copy the Instrumentation Key and note it down
- Back in the <wizdom web app name> in the Settings section click Application Settings
- In the App settings section, create a new key (or rename the one automatically created by the App Insight installation) with the following information:
- Key = <ApplicationInsightsInstrumentationKey>
- Value = <The Instrumentation Key from step 9>
- Back in the <wizdom web app name> click Overview
- Restart the <wizdom web app name> web app
Wizdom configuration
- If SharePoint online: Login to https://CUSTOMER.sharepoint.com/sites/wizdomportal using <SPOadminAccount>
- If SharePoint 2013/2016 on-prem: Login to https://CUSTOMER
- Go to Site Content and click the Wizdom add-in
- Click Modules and the Analytics
- Enable Enable analytics and statistics collection

Configuring data in Wizdom database
- Login to https://portal.azure.com using <AzureAdminAccount>
- Click the Wizdom Resource group = <wizdom resource group name>
- Click the Application Insights application = <wizdom application insights instance name>
- Click Access Control (IAM)
- Add the <Service account (App insights reader)> as reader
- Click the Wizdom Resource group = <wizdom resource group name>
- Click the Web Application = <wizdom web app name>
- In the Settings section click Application Settings
- In the App settings section, create new keys with the following information:
- Key = ApplicationInsightsUsername
- Value = <Service account (App insights reader)>
- Key = ApplicationInsightsPassword
- Value = <Service acc. password (App insights reader)>
- Click Save
- Back in the <wizdom web app name> click Overview
- Restart the <wizdom web app name> web app
- Login to https://CUSTOMER.sharepoint.com/sites/wizdomportal using <SPOadminAccount>
- Go to Site Content and click the Wizdom add-in
- Click Modules and then Analytics
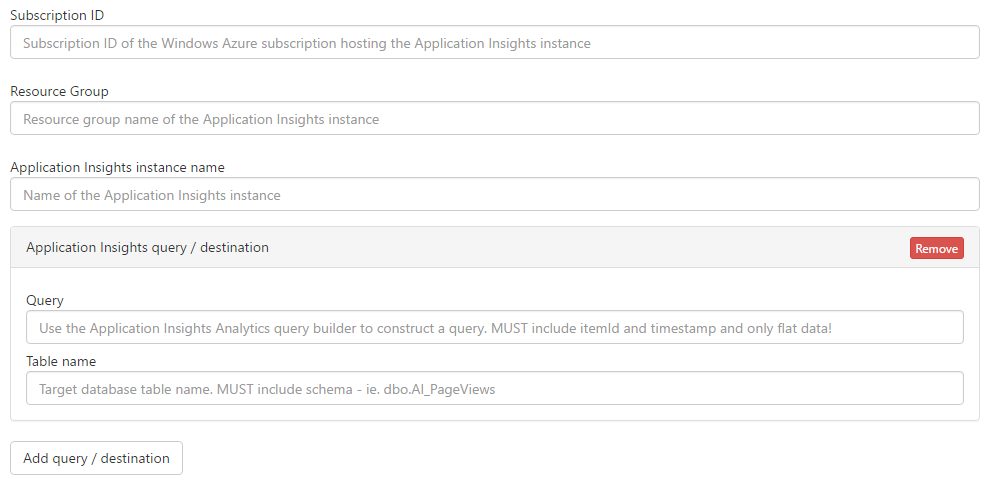
- Configure the following settings:
- Subscription ID = < Wizdom Azure subscription ID>
- Resource Group = <Wizdom resource group name>
- Application Insights Instance Name = <wizdom application insights instance name>
- Click Save configuration
- Click Admin and then Timerjobs
- Click Run now on ApplicationInsightsDataImport
- Optional: Using SQL Server Management Studio connect to the Wizdom database in Azure and confirm that the table dbo.AI_PageViews has been created